Finish off your Smart Sofa Station with confidence - it's that last 10% that makes all the difference!
Congratulations if you've made this far in your Smart Sofa Station adventure!
So many of you have contacted me to say you’ve had a lovely time sewing this pattern and that it's already made a huge difference to your sofa crafting. It’s so encouraging to hear that it’s been so useful and a great experience.
I’ve seen some fabulous finishes, but if you’re still assembling and binding yours, I have a few extra tips you to help make your final touches easier.
If you'd like to catch up on all the previous posts full of tips and info you can check out here, here and here.
Sewing with Varying Layers
When we start adding the flaps and pockets to the base, the overall thickness increases quite a lot. This means that sometimes you'll be sewing just a few layers and then - boom! - you'll be doubling that when you go over a flap.
To help get through those extra layers, I like to size up my needle to a 90/14, and increase my stitch length to 3.

Unfortunately, you do need a reasonably decent sewing machine when it comes to sewing bulk.
If you have just a very basic one, it might not have the oomph needed to get through all these layers.
So if you’re finding your machine is really struggling, skipping stitches, and you’ve already upped your needle size, then just go slow and that should help as well.

Magnetic Attraction
Let's talk about adding the magnets that make this pattern so versatile with the snap-on, snap-off attachments.
We'll be using neodymium magnets which are small, but very strong. There are several things to remember when dealing with these magnets:
- keep them away from children and pets - the pattern tells you to enclose these so they will not fall out or be a hazard
- they are sensitive to heat - so don't iron them directly or they can lose their magnetism. However, if they do, it's a simple matter to re-magnetise them simply by touching one side with the opposite pole of another magnet, then repeating this on the other side. Repeat until you can feel it's working again.
- keep them away from direct contact with phones or other electronic devices.
When you're installing these, it's good to make sure the poles of the magnets on the base are both facing the same direction so that the top notions will be interchangeable on either one and you can switch them around. If you mess this up, take the time to re-do as you will thank yourself later.
Secrets to Great Binding
The method I’ve used in this pattern for the pockets and exterior is the double fold binding method, meaning it’s folded in half, and then stitched along the raw edge, and then folded around the whole edge again.
Bear in mind this is only one of the ways that you can apply bias binding.
If you have a different preferred method, feel free to do it your own way. I find the double fold method is less fiddly to apply overall, but it does use more fabric as you’re cutting wider strips.
Make sure to have your tools ready to ensure success:
- a stiletto is a sharp pointy tool that helps you manipulate fabric right under the machine foot. Small pointy scissors also do the job, and mine is actually an awl from a bias binding kit
- get plenty of binding clips which work better than pins for thick layers
- Fabric Safe glue
- Fineline glue tip

As you clip the binding to the base, the key here is to have it fitting snuggly along the edge, but not stretched. Make sure you're not stretching one edge more than the other edge which makes the binding have a twist to it.
When you come to the curved corners, you need to ease (slightly loosen) it to allow for the bend. If you stretch the binding around the corners it will end up too tight.
Keep your stiletto or small sharp scissors in your hand as you’re stitching to help give you great control.
Use it to get right in close to the needle and keep everything where it needs to be, as the bias has a tendency to want to move out of the way.
As you stitch around the base, you’ll be transitioning from a few layers to many layers as you go over the flap and pockets. I like to slightly vary my seam allowance to compensate for the extra bulk so that you don’t end up with not enough binding to turn under. Try this and you’ll see it works a treat!
Don’t forget to add glue to your sewing tools arsenal - this is not cheating at all! It means that you have your hands freed up for concentrating on just sewing a nice straight stitch.
I love using either glue sticks (school glue) or craft glue in a handy applicator like this one. It holds your fabric securely in places where a pin or clip is hard to use. It’s easy to sew through and will transform your sewing skills no end.
Use this to hold your binding in place when you come to stitch the right side, and it will be perfectly aligned.
You can see all these tips in the YouTube video here.
Terrific Top Stitching
Any time you need to top stitch - there's one simple thing you should do that will really make your stitching pop ...
Increase your stitch length!
If you ever look at purchased items with top stitching you'll notice they all have longer stitches and they look good.
And there's really nothing worse than stitching that's on show and is just tiny.
This is often exacerbated by sewing on a home sewing machine that's not coping that well with lots of layers - so it tends to 'chew' the fabric rather than move it through.
So, lengthen your stitch length to between 3-4 and it will actually it feed better as won't just chew up the layers.

Creative Maker Inspo
Now let’s show off some of the awesome makes from the Facebook group!
These awesome makers have been coming up with their own spin on everything. From adding embroidery to the flaps, to using decorative ribbon instead of bias tape, and creative problem solving, they’re so clever!

Karen's created a beautiful version in Acufactum fabrics, paired with a gorgeous Tilda Woodland binding. She also found a way to adhere her needle minder when the magnet wouldn't hold it properly. Clever!
This is Adrienne's lovely version featuring some more Acufactum fabric and using some gorgeous ribbon in place of the binding trim along the top.
If you're ever stuck with where to use ribbon like this, this is a fabulous idea.

Kathy's version is so crispy and neat, and I think you can't go wrong with this classy colour combination!

I showed you the beginnings of Stephanie's Station last week, and here it is all finished!
Stephanie's appliqued a sweet flower onto the base, and included a red heart button, which shows how much love was stitched into this.
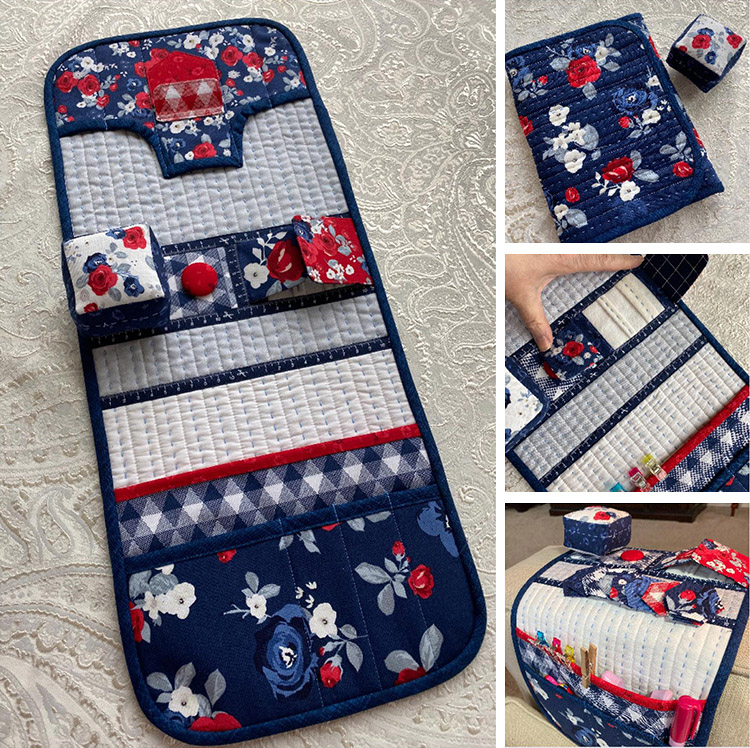
Here's a look at my finished Station in these pretty fabrics ...


Thanks so much for following along this far!
If you have any further questions, don't forget the Facebook group is a great place to ask for those who've already made one or several!


Join my Facebook community

If you're a social bee, get involved with over 1100 sewists, quilters, and creators from around the world. Share your creations and get inspired!