Hi Liberty loving friends! Today I have a fun no-sew tutorial to make a Liberty Matchbook...
Hi Liberty loving friends!
Today I have a super fun no sew tutorial to make a Liberty Needle Matchbook in three sizes.

I love the vintage matchbooks of yester-year and I love using my Liberty in unexpected ways.
I stumbled across a photo of a vintage paper matchbook the other day, and immediately set about trying to figure out how to create something like that in Liberty fabrics.
The result was surprisingly sturdy, and looks fantastic in Liberty's vibrant colours!
This is a completely sewing machine free project, and something you can make from start to finish in less than an hour.
Infact you can make a bunch of these in that time! It's great for small scraps of Liberty, and fully customisable to your own taste.
I've used some of the Liberty from my monthly Society bundle.
My Liberty Needle Matchbooks use thick interfacing and fusible web to join two layers of fabric together, and uses a piece of wool felt inside to hold the needles.
You can add hand stitching or embellishments to hold the felt in place. I experimented with the type and amount of interfacing that you need to reach optimum stiffness, so each needle book that you see is actually made slightly differently.
But they all work just fine, and this means you can use whatever interfacing you've got on hand.
- the first one has one layer of fusible cotton woven interfacing (SF-101), a layer of fusible web, and a layer of Craft Fuse (L-808)
- For the next I tried two layers of cotton woven interfacing, a layer of fusible web, and Craft Fuse. The result was slightly stiffer, but the first one was perfectly adequate
- In the last one I used one layer of Shape & Fuse, a layer of fusible web, with one layer of Craft Fuse.
Confused?
There wasn't a lot of noticeable stiffness difference between all three, but you're basically making an interfacing sandwich.
You can counter the fraying aspect of raw edges by rubbing a small amount of craft glue along the edges, and found this works really well!
The best part about using Liberty is that being a fine weave, it doesn't fray much anyway. But if you want to mix in different fabrics, the glue is a must.
I've used a fun grid low volume print for the inside of some of mine.
There are three sizes to choose from, and they each measure (folded) SMALL 2" x 3", MEDIUM 3" x 3", and LARGE 4" x 3".
To get started, here's what you need for one needle book:
- 5" x 7" scrap of Liberty for outside
- 5" x 7" scrap of Liberty for inside
- 5" x 7" Peltex 71F Fusible single sided (in the US) OR L71-F Shape & Fuse (in AUS)
- 5" x 7" Wonder Under (in the US) OR L-805 Fuse Under (in AUS)
- 4" x 3" piece of wool felt
- hera marker or scoring tool
- pinking shears or scalloped scissors
- craft glue for eges
- toothpick
Optional embellishments:
- perle 08 thread or suitable metal fixing tag
- 3/8" eyelet (optional
- 5" length of leather lacing
STEP 1
Read right through before beginning :)
Decide which is your outer fabric and inner fabric.
Fuse the thicker interfacing to the outer fabric, and the fusible web to to the inner fabric.
Check they are really firmly fused, otherwise they will come apart later on.

Then fuse your layers together by removing the backing paper from the fusible web.
Make sure you line up your grain or any pattern you'd like to cut straight, as when you trim them down you won't be able to see that back side.

STEP 2
Cut down the fused panel to 7" long by the required width following the sizes on the graphic below.


STEP 3
Following the scoring measurements in the graphic above, score at intervals with your hera marker, pressing nice and hard to get a crisp mark.
Make sure you measure each mark up from the end measurement, otherwise you won't have your 1" left at the end.

Now you can trim the edge closest to the 1" fold with pinking shears to give an interesting finish.
Carefully fold your fabric along each of the scoring lines, and give each one a good press, making sure your matchbook is folding up straight.
STEP 4
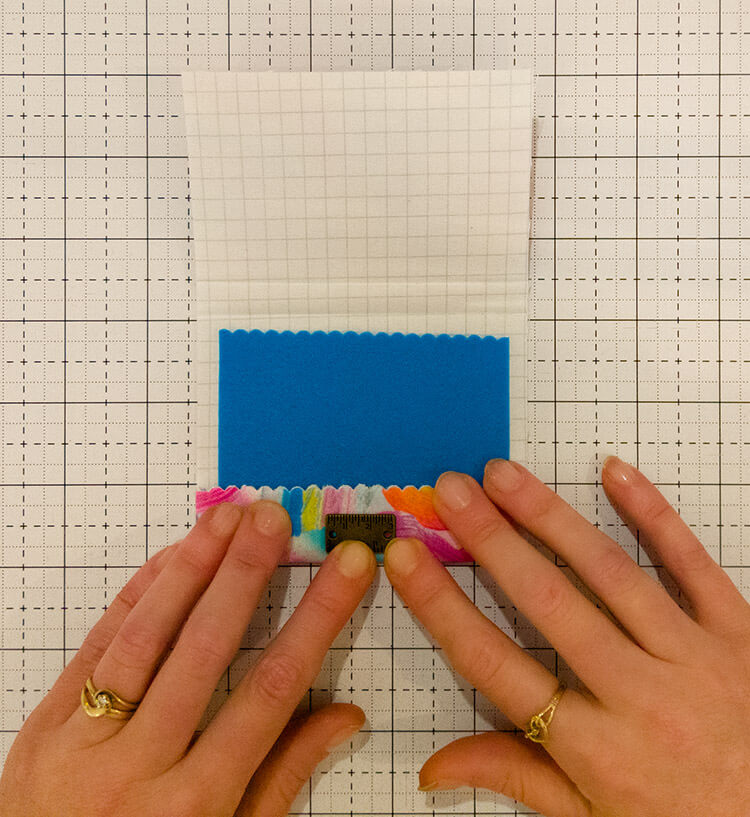
Before adding the felt insert, I recommend pressing the felt lightly with the iron.
This will shrink it slightly and avoid any wonky edges that will disappoint you if you press after you've trimmed down to size.
Cut felt down to size 2 1/2" long by 1 1/2" (SMALL), 2 1/2" (MEDIUM), or 3 1/2" (LARGE).
Now you can "pink" one edge.

STEP 5
Place your felt into the matchbook, with the scalloped edge facing away from the short folded edge.
Fold over the short folded edge, and catch the felt inside with big stitches, or an embellishment of your choice.
I then dabbed very small amounts of craft glue with a toothpick around the edges and along the scalloped edge too.
When this dries, you can go back and trim any remaining threads that might be hanging off.

See all the pics for what I've added to make each one unique!
Fill up with needles and pins, and pop in your sewing kit for easy access!


PIN for future reference!

If you make one these, be sure and tag me!
Share using #LibertyMatchBook to social media.


Join my Facebook community

If you're a social bee, get involved with over 1100 sewists, quilters, and creators from around the world. Share your creations and get inspired!