Make your flaps with confidence & be inspired by other gorgeous ideas from participants
Welcome to the next installment of support information for sewing the Smart Sofa Station.
I’ve been sew excited to see so many of you making a start, and some of you even zooming ahead with enthusiasm!
You can catch up on past blog posts here and here.
I’ll share some of my favourites below so make sure you read to the end!
This is the part of the pattern when you'll be making the the pockets, flaps and other extra bits.
Now I’m not going to sugar coat this…there’s a reason I labelled this pattern as an ‘intrepid adventure’.
It has small pieces, multiple layers, and requires a level of precise sewing to get a crisp look to the flaps.
This isn't to discourage you at all, but to help you understand that there is an extra level of effort and patience involved. Believe me when I say, the results are sooo worth it!
All About the Interfacings Used in this Project
The interfacing is there for a good reason, and if you’re new to what this is for, it’s a carry over from dressmaking.
When you're sewing clothing, the fabric is reinforced with another layer or layers to make it behave slightly differently from normal.
Interfacings come in various weights, compositions and are either fusible (glued on with an iron) or sewn in place in the seam allowance.
There are many brands of interfacings made by different companies that can be substituted for one another, and some are only available in certain countries.
In our case, we need the flaps to have a bit more stiffness than just fabric by itself, and cope well with being manipulated into a small shape that will be turned right side out.

The first interfacing used in this pattern is a medium weight fusible woven (Interfacing A) Pellon Shape Flex 101 (SF101). This is interfacing that's about the same weight as quilting cotton.
When fused to the back of the fabric, it provides stability that stops the piece warping out of shape as it’s manipulated. I love it because it doesn't change the texture of the fabric at all - it still looks just like cotton fabric, just a little bit stiffer.
This is fused first before adding any other layers of interfacing to prevent the bumpy texture that other synthetic interfacings will leave.
The second interfacing I use here is a non-woven fusible interfacing (Interfacing B) Pellon Craft Fuse 808 (CF 808). This is a medium weight fusible interfacing that has a paper like quality.
It adds stiffness to the fabric, and helps give a really crisp look.
We use these two interfacings together to get the best of both worlds, stability and stiffness.
If you’re not sure which interfacing is which, you can tell them apart by noting that the SF 101 has large weave to it, and the CF 808 has a paper like quality.
Interfacing Substitutions
You can substitute any similar weight interfacing in a different brand depending on what you can get in your part of the world. You can even leave these out, but you won't get the same result :).
In Australia you can substitute these interfacings here:
- Birch Shape to Create Woven Fusible instead of Pellon SF101
- Birch Shape to Create Non-woven fusible interfacing for Pellon CF808
- Legacy fusible fleece instead of Pellon 987F
Notice the difference between the glue side and the non-glue side, and make sure you never touch your iron onto the glue side.
You’ll notice that the template pieces are smaller for the interfacings than they are for the main flap pieces.
That’s because too many layers in the seam quickly becomes unruly, and makes the whole piece look bulky. You’ll achieve much smoother seams when the interfacing is not sewn into them.
Another bonus about having these smaller, is that you can use the edge of your interfacing as your seam allowance guide when stitching.
Remember to watch the videos for further help on how to sew these and get a lovely result.
Cute Ideas to Add Personality to Your Project
One of my favourite things about remaking a pattern I’ve already written, is seeing how I can change it up a bit by adding in new and unexpected touches.
I love adding cute buttons, tags, hand stitches, and even piecing a panel from patchwork in place of some of the pockets.

I encourage you to collect ideas from others that appeal to you to add your own personal flair and style to a project.
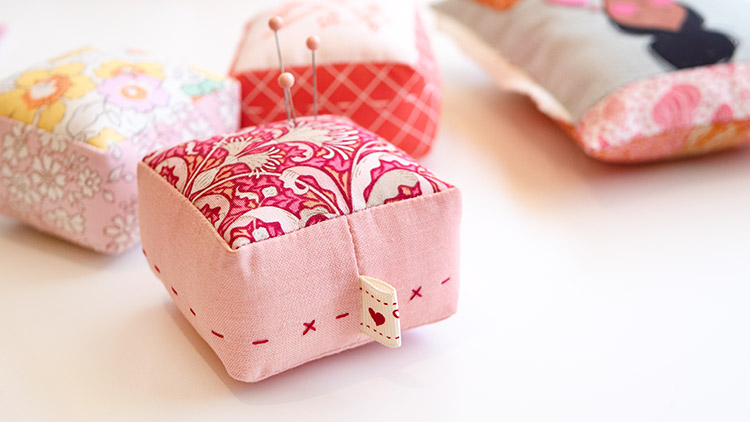
This time I’ve added a little ribbon tag into the seam of the pincushion, and some tiny cross stitches into the hand quilting.


This makes a feature out the back seam on the pincushion, and instead of making you want to hide it, shows it off!
I’ve also added some cross stiches to the flap and the needle keeper, to tie these little touches together, and I'll show you more of these later.
Needle Minder Magic
One of my favourite parts about the functionality of this project is the needle minder.
Believe me, if you've ever lost your needle and then found it later the hard way, a magnetic needle minder is your best friend!
These are the actually the fastest part to make in the whole pattern - and require zero sewing. You will need the following supplies:
- Size 45 Flat backed self-cover button
- E6000 super glue - I like to glue the magnet in just for safety reasons
- neodymium magnet
- Button covering kit
- 2.5" circle of fabric
I get my flat back self cover buttons from Ebay in Australia, but if you're in the USA, try here for many sizes to choose from. If you can't find flat backed buttons you might need to snip the wire off the back to make your own flat backed button.
The only precise part of making this comes if you need to centre a fussy-cut image on your fabric in the centre of the button. The tricky part can be that the fabric can move a little bit when you're pushing the button into the mold which might make it off-centre. So take your time pushing the button down, as once it's in there and the back is on, it's very hard to separate them again without ruining your button.
Watch here to see how easy this is to make:

Don't forget you can now add even more useful parts to your station with the Snips & Tails Mini-Bucket and the Catch-All Cup.
Sew-Along Inspiration
Now let’s have a look at some of the inspiration from the Facebook group!
I'm always delighted to see how you take a project and make it your own...I love to see styles very different from my own, and see others bold enough to take risks!

Tracey has made a start using Tula Pink's Linework fabric.
Love the dramatic fabric!

Stephanie is using some lovely teal Liberty fabrics...another fabric range close to my heart.

Lyn has put lots of her own touches into her version.
She's using some sweet Tilda pinks, and added a cute dresden plate appliqued onto the pocket.

Look at the pretty piping in the seams!
There have been many many more that I would love to share here, and if you'd like to see more, hop on over to the Facebook Group to see plenty more examples and share your own progress!
Happy sewing!


Join my Facebook community

If you're a social bee, get involved with over 1100 sewists, quilters, and creators from around the world. Share your creations and get inspired!