A super useful, super cute sewing tote, that comes with all the hardware included ...
Introducing the Stylish Sewing Caddy Pattern
A couple of weeks ago, Zakka Workshop sent me one of their new sewing kit patterns to try out. Their kits contain a beautiful pattern with some fun additions to help you make the project. This kit is the Stylish Sewing Caddy and contains a pink hoop zipper and a wire frame set so you don’t have to shop for extra bits.
I've made a couple of their other products in the past ... the Heart Clasp Purse and the Flying Geese Pouch, both firm favourites that turned out beautifully.

The Stylish Sewing Caddy is exactly that, a useful wide mouthed bag that’s sturdy and can hold a great deal. It's designed by one of my favourite designers Kristyne Czepuryk of Pretty by Hand, whose blog I used to read voraciously when I first started out sewing.
Kristyne has turned her talents to designing small bags and pouches in the past couple of years and I for one, am hooked. When a clever one comes along like one of these, I can never have enough. I always have multiple projects on the go, am always needing to take something with me when I travel, so another one is always welcome.

And I don’t know about you, but I’m always looking for crafty gifts. They're great for that crocheter or knitter in your life who doesn’t sew much herself but really appreciates something handmade.
But let me warn you, these are really hard to give away!
Ramp Up the Zakka Style
As with all Zakka projects, the whole point is to use cute elements to create special moments within the project to grab your attention and focus your eye.

So in true Zakka style, I had a lot of fun pulling fabric for this little bag. As I’ve been having rather a Ruby Star Society obsession lately, I’ve been collecting without a lot of thought for what I’d use it for. I know, I know.

This is not how I aim to to be.
I’m usually a very intentional fabric buyer but some lines are sooo … anyhow.
It was great to be able to actually dive into this stash and use it to sew a special project that really made the fabric sing.
Fussy cuts eat your heart out!
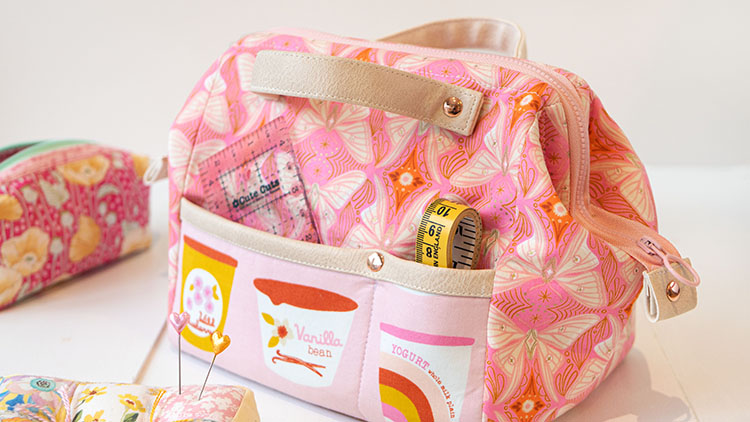
The yogurt cups on the pockets are from the Strawberry and Friends line, paired with the vibrant butterflies from the Camelia line and one of the spots on the base. The lining is from Tarry Town, a reminder to slow down and enjoy the moment.
I love how the whole bag turned out so bright and happy. My favourite thing to add at the moment is some extra trim to the tops of the pockets. I love it in stripes, tiny florals, and right now, in vinyl.

You can pair vinyl with rivets and make the handles in vinyl, and you have a whole new look that’s extra classy. That rose gold is the perfect excuse to add some amazing bling.
So if you have a some vinyl off-cuts hanging around, give this a go! You don’t need any special needle or thread. Just experiment first to see how well your machine copes with extra layer thickness.
I’ve also added vinyl as the zipper tabs at either end, and also another excuse for more of those o-sew-pretty rivets.

Another favourite element is the little Zakka tag hanging from the zipper pull, also from Ruby Star Society.
It's something I’ve been hanging onto for ages as well.

Pockets and Frames
The outer pockets are really clever, as you can stash quite a range of notions in them while you're using them. Play with how you divide up the outer pockets, and think about what you’d like to store in them to make the best use of the space.

Then you can pack everything inside ready to travel so that nothing is lost.

Load this up with your favourite sewing accessories and handmade pinnies and needle books.
I like my bags to have a bit more body and support than the pattern calls for, so I’ve added a layer of fusible woven interfacing in addition to the fleece and also to the lining, extra non-woven to the pockets, and a super stiff base so it doesn’t sag when fully loaded.
If you keep all of this out of the seam allowance it doesn't add bulky layers to the seams, but adds a ton more stability to finished product.

My kids were quite taken with the ‘doctor’s bag’ shape of the bag, and thought it was really quite unique.
I love those frames for how useful they are in adding useability. They help hold the bag up and help it stay open, two great qualities in any bag ;)
If you’ve never used frames in a project before, what are you waiting for??
These are so simple to install and get inserted right at the last step.
You might have noticed that I've opted not to adjust the sides of the bag as in the pattern photo, but to leave it with a more natural slouch.
What do you think? Do you like those corners neatly put away, or more of a casual vibe?
This bag is a really easy make, perfect for a confident beginner. It’s all just flat panels that are just assembled at the end, so you can totally do this! If you're confident jazz it up with extra trim and bling, but otherwise you'll still create a stunning bag that will work amazingly well.
I hope you check out Zakka Workshop and their lovely range of kits and patterns.
Grab a copy so you can make something cute today!


Join my Facebook community

If you're a social bee, get involved with over 1100 sewists, quilters, and creators from around the world. Share your creations and get inspired!